Automation Basics: A Beginner's Guide
If you've ever set up an out-of-office reply on your email, you've already built an automation.
Automation may sound technical — like something only an engineer can do, or your IT team, or developers. But a few years ago, with the rise of LLMs, everything changed. Automation is no longer only for developers and techies. It may sound technical on the surface, but anyone can learn the basics in an afternoon and be building useful, time-saving automations within a couple of days.
The aim of this post is to cover those basics, written in very simple terms. Once you understand the concepts, you can decide if it's something you want to dive into.
What's actually inside an automation
Every automation — whether it's a Gmail filter, a Zapier workflow, or an autonomous AI agent — boils down to three pieces:
Trigger. The thing that kicks the automation off. Someone fills out a form. An email arrives. A meeting ends. The clock hits 7 AM. A trigger is just an event the automation is listening for.
Pass Data. The information the trigger captured, handed forward to the next step. The trigger picks up "Sarah submitted the contact form, here's her name and email" — and passes that data on so the next step knows what to do.
Action. What happens with the data. Send Sarah a welcome email. Add her to your CRM. Post a Slack message to your team. Whatever the work is, that's the action.
That's the whole foundation. Trigger → Pass Data → Action. Once you see it, you'll start spotting it in every automation you encounter.

Filters and branching: when "do this" isn't enough
A trigger plus an action handles a lot, but most real automations need to make a decision somewhere. That's where filters and branching come in.
A filter is a checkpoint. Only proceed if this condition is true. "Only send the welcome email if the form was submitted from a US zip code." "Only create the task if the email subject contains the word 'urgent.'" Filters keep automations from running when they shouldn't.
Branching (sometimes called routing) is a fork in the road. If this, do A. If that, do B. "If the customer is on the enterprise plan, route to the senior support team. Otherwise, route to general support." One trigger, two (or more) different paths depending on the data.
Together, these two concepts are what take an automation from a one-trick rule to something that handles real-world variation. Most of the automations I build for clients have at least one filter or branch in them — that's where the actual judgment lives.
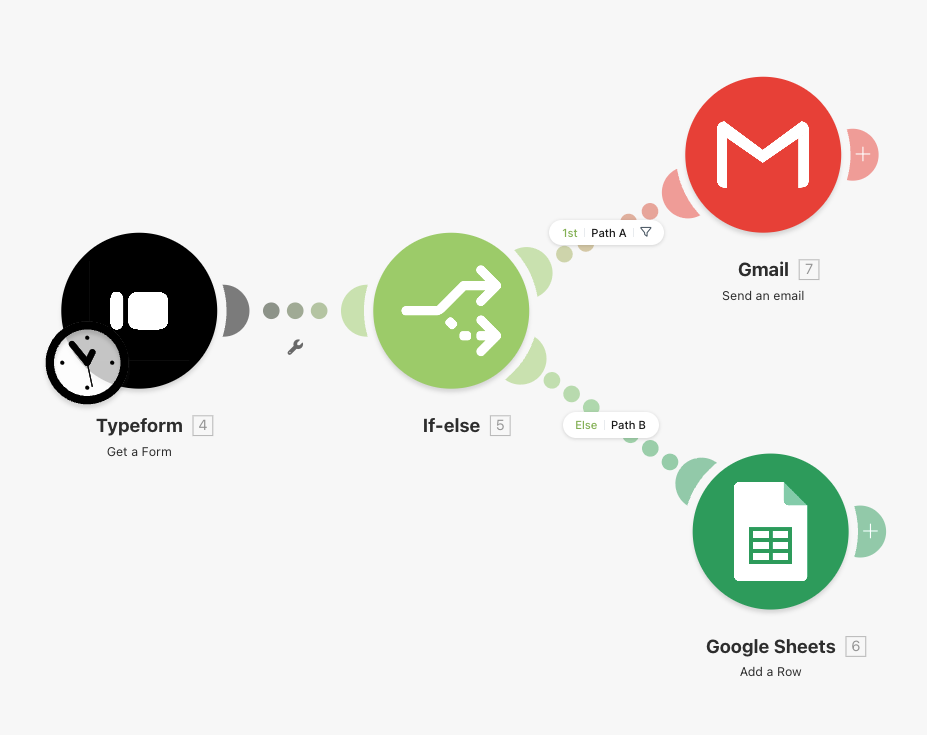
And here's what that looks like as a router on an actual automation canvas:
Stringing actions together
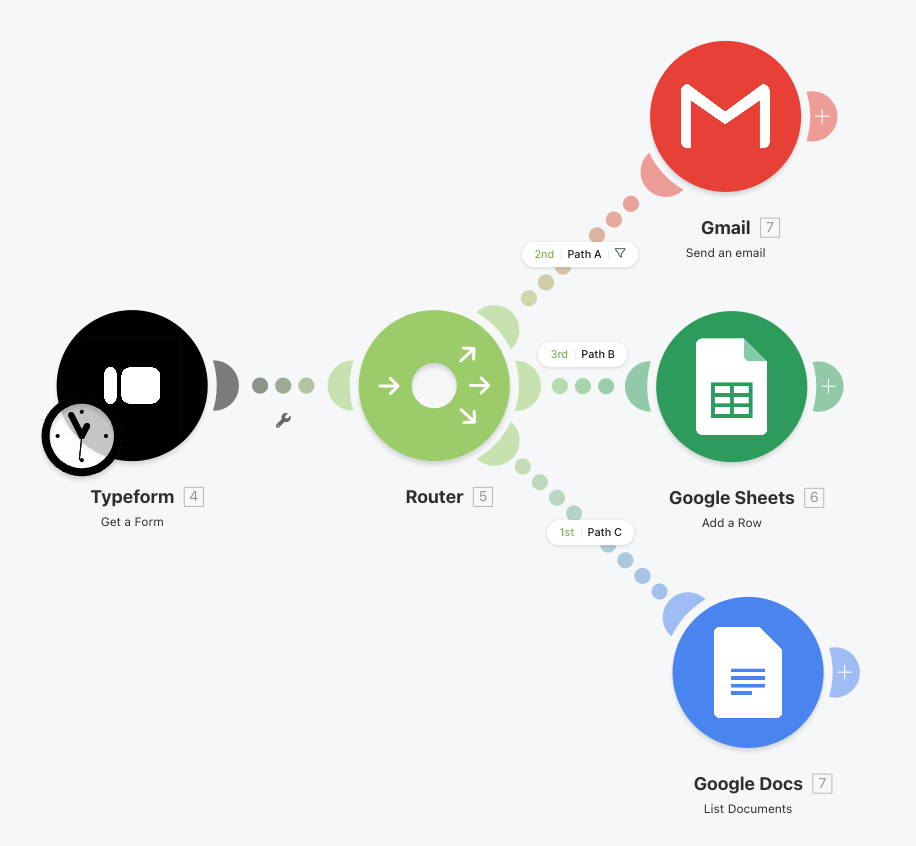
Most useful automations don't stop at a single action. Once a trigger fires, you can chain several actions in sequence — each one using the data from the steps before it.
Here's a simple example: a contact form on your website triggers an automation.
- Action 1: create a CRM record from the form data.
- Action 2: send the contact a welcome email referencing what they wrote.
- Action 3: post a notification in your team's Slack so someone follows up.
- Action 4: log the whole thing in a spreadsheet for tracking.
One trigger, four different actions, data gets passed from one step to the next. Each step uses information from the previous steps — the welcome email pulls the name from the CRM record, the Slack message links to the new CRM record, and so on. Visually, it's the same building blocks repeated:
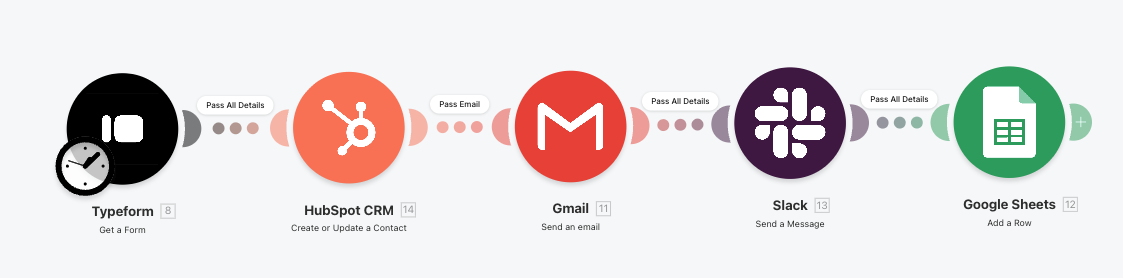
Whether it's a simple two-step automation or a complex multi-step process, these chains are collectively referred to as flows or workflows. When someone says they "built a flow in Make.com" or "set up a Zapier workflow," that's what they mean — a chained sequence of actions kicked off by a single trigger.
Most useful automations are workflows. The single-action version is the toy demo. The chained version is what actually saves a small business hours a week.
Where automations actually live
There are basically three places automations can live.
Inside the apps you already use. Most modern tools have automation built right in. Gmail filters for labeling incoming email. Calendar reminders that fire 15 minutes before a meeting. Slack workflows that route #help requests to the right channel. Most modern apps have pre-built automations you can configure out of the box.
On a dedicated automation platform. This is what Make.com, Zapier, and n8n do. They sit between your apps, watching for events in one and triggering actions in another. This is where you go when your automation has to span multiple apps — when a form submission needs to create a CRM record AND send a welcome email AND post a Slack notification. The platform is the connective tissue between everything else. I cover the three I use most — Make.com, Zapier, and n8n — in more detail in my low-code automation tools post.
On your own computer. Some automations run locally — a script on your laptop, a Mac shortcut, a Python file that organizes a folder, or, increasingly, a tool like Claude Cowork that runs on your machine and can orchestrate work across all your apps. Local automation is faster, more private (your data never leaves your computer), and avoids the per-task fees that platform-based automation can rack up — but it only runs while your computer is on.
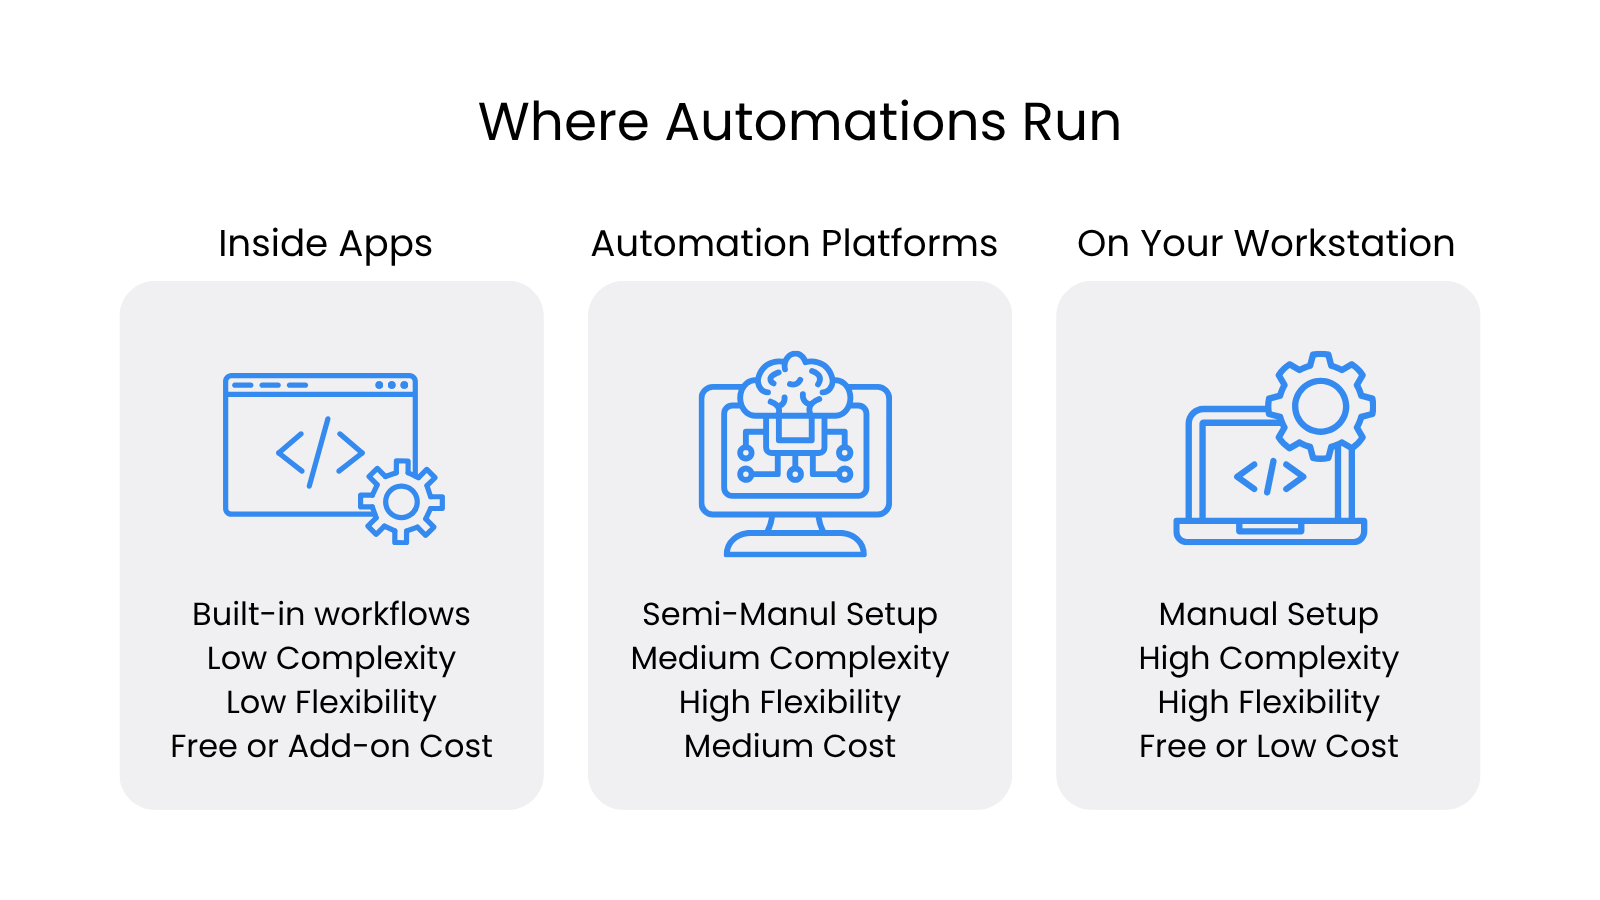
Each has trade-offs. In-app automations are the simplest to set up, but you have limited control. Local automations are the most flexible, but they can be complex to troubleshoot — and they require your machine to be running. Dedicated automation platforms sit in the middle: designed to simplify building, running, and connecting your apps — but they come with costs once you exceed the free tier (most platforms offer generous free plans, so you can build and learn for free, and only pay once you're running real volume).
How does data actually move between apps?
Now that you know where automations can run, there's one more piece worth understanding — how all these apps actually talk to each other. How does the form on your website send data to Make.com? How does Make tell Gmail to send an email on your behalf? They're separate companies, separate apps, separate everything. This is the part that confuses a lot of people.
Imagine each app as a company with different departments. If we use Google Calendar as an example, one department handles creating events, another handles deleting events, a third handles updating events, and so on.
When an automation wants to do something, it needs to know which department to call. It has the company address — 1 Google Way — but it also needs the "Attention:" line: "Attention: create_event" or "Attention: delete_event." Without that, the request never makes it to the right desk.
Every company publishes a list of its departments. Google, for example, has things like:
google_calendar_create_eventgoogle_calendar_delete_eventgoogle_gmail_draft_emailgoogle_gmail_send_email
Google has hundreds of departments doing specialized tasks, and they publish this list publicly so anyone can call on their services. Collectively, this list of available services is known as an API, and each individual department is an API endpoint.
When Make.com needs to send an email, it makes an API call to an API endpoint at Google.
Most major companies — Google, Microsoft, Stripe, Slack, you name it — have publicly available APIs that allow other companies (or automation tools) to talk back and forth, without a person involved.
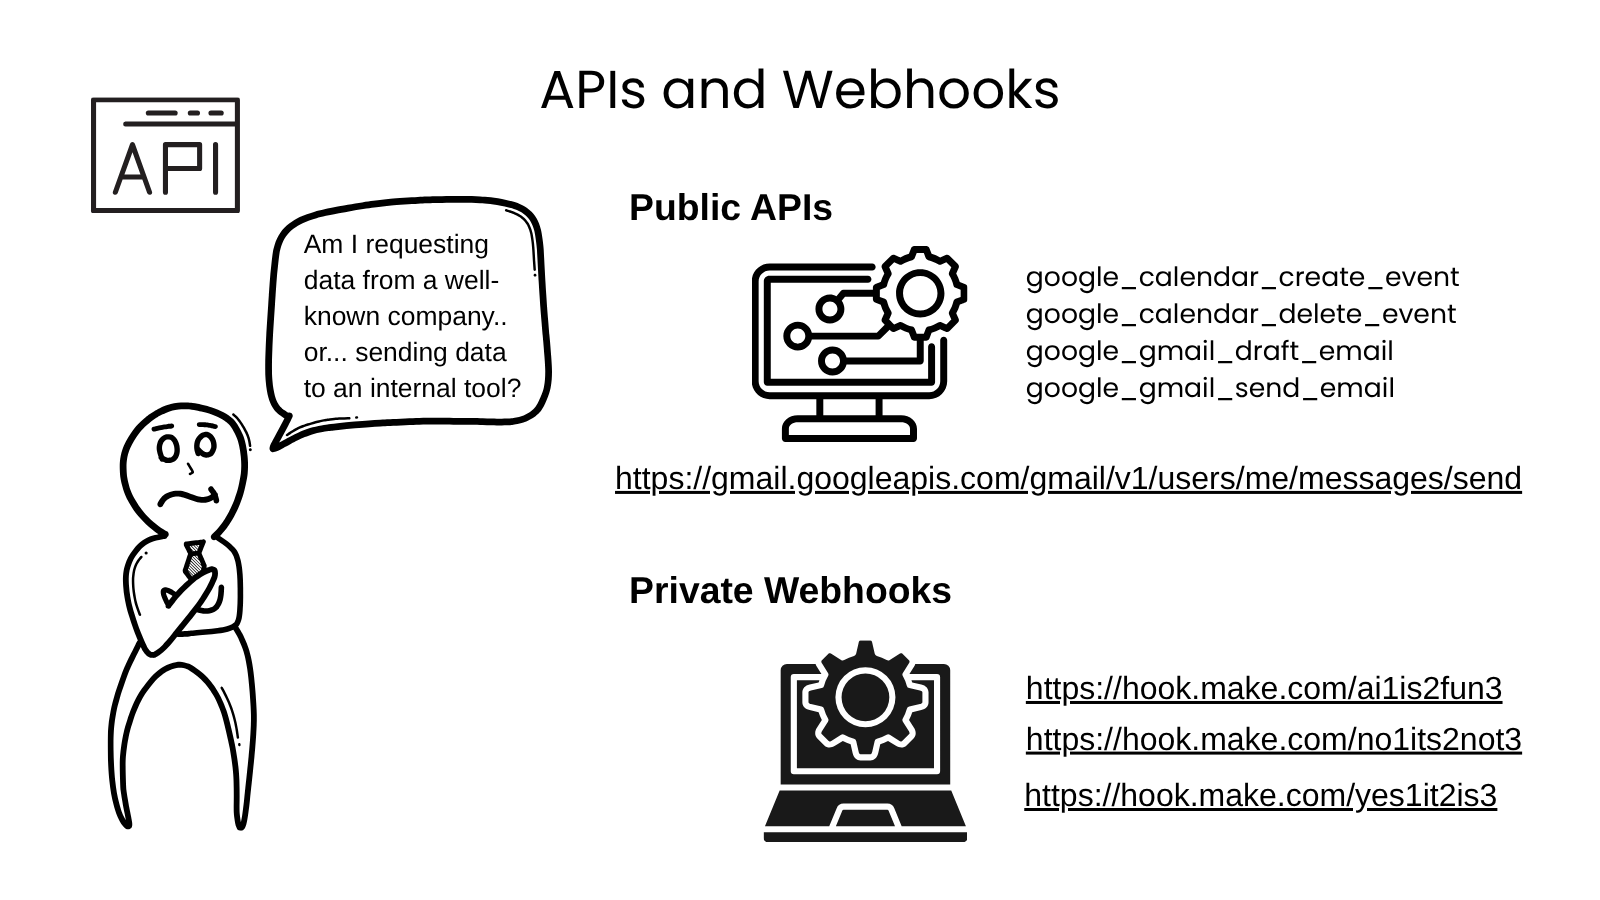
Private addresses: webhooks
Okay, we've talked about sending data back and forth between Google, Slack, Stripe, etc. — aka big companies with public APIs. But what about YOUR data, YOUR apps, and YOUR workflows?
This is where webhooks come in. Webhooks are unique private addresses that are only used by you, your organization, and your automations. They're how you pass data from your systems into your automations. For example:
- Someone submits a form, data gets sent to a Make.com webhook that handles an outreach flow — drafting a welcome email, creating a CRM record, and pinging the team in Slack.
- Someone books a meeting, data gets sent to a Zapier webhook that handles a meeting-prep flow — researching the attendee, drafting an agenda, and adding them to your CRM.
- Someone signs a document, data gets sent to an n8n webhook that handles the post-signing process — sending the first invoice, creating an onboarding folder, and kicking off the project plan.
- Someone opens a support ticket, data gets sent to a Zendesk webhook that handles a support flow — triaging the ticket, sending an acknowledgement, and starting an SLA timer.
Webhooks are private addresses generated by your automation platform — basically a "send to:" address for your workflow. Private addresses are necessary because you don't want everyone in the world to be able to send data to your internal automation flows.
Let's walk through a concrete example. Say you have a contact form on your website. Normally, when someone submits the form, you get an email about it and handle it manually. Now you want Make.com to handle it instead — log the submission, send a welcome email, add the contact to your CRM, whatever.
Setting that up takes two steps, on two different sides:
- In Make.com, you start a new workflow and tell Make: "this should be triggered by a webhook." Make generates a unique address just for that workflow — something like
https://hook.make.com/a1b2c3xyz. That URL is the webhook. It's now sitting there waiting for someone to send something to it. - In your form's settings, you copy that URL out of Make and paste it into the "Send submissions to" or "Webhook URL" field. Almost every form tool — Typeform, WordPress forms, Cal.com, custom HTML — has one. You're telling the form: "Here's the address. Mail every submission here."
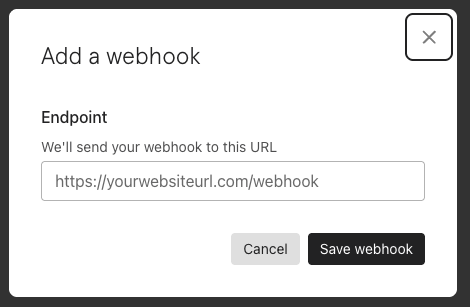
Once both sides are wired up, the running picture looks like this: someone fills out the form, the form takes the submission and mails it to the webhook URL, Make receives it, and your workflow starts running.
In our mailroom analogy, the webhook URL is like a P.O. Box for your workflow. Make hands you the address (step 1). You go pin that address to your form's outbound mail desk (step 2). From then on, the form mails every new submission straight to that P.O. Box, and Make picks it up.
Wait — does every automation need a webhook?
No. Webhooks only come into play when an external app needs to push data into your automation — like a form submission, a payment, a sale on Shopify, a Slack message.
Plenty of automations don't need a webhook at all. Some examples:
- A workflow that runs on a schedule (every day at 9 AM, every Monday morning, etc.) — Make watches the clock itself.
- A workflow that checks Gmail every 15 minutes for new emails — Make reaches out to Gmail (an API call) on its own schedule, no webhook involved.
- A workflow you trigger manually by clicking a button.
Almost every automation makes API calls — that's how actions work (sending an email through Gmail, creating a CRM record, posting to Slack). Webhooks are different: they're only necessary when an external app needs to push data into your automation. Most workflows don't need one.
You'll also notice that for the same end result, you often have a choice. Take the form example: you could give the form a webhook so it sends submissions directly to Make, or keep getting the email and have Make check your Gmail every 15 minutes (this is called polling). Same outcome, different wiring. Webhooks are usually faster and cleaner when the option exists; polling works fine when it doesn't. This kind of "more than one way to do it" choice shows up everywhere once you start building.
How AI is changing the picture
For most of automation's history, the rules have been rigid: if X, then Y. Hard-coded. Predictable. Brittle the moment the input doesn't match the rule.
That's what AI changed.
A modern automation can drop an AI model into the middle of the workflow and use it to interpret the input rather than just match it against a rule. An email comes in — instead of a rigid filter that only catches subject lines containing "invoice," an AI step reads the whole email and decides whether it's actually an invoice, what the amount is, who the vendor is, and which account it should be coded to. Same trigger and action; the AI is the part doing the thinking in the middle.
This is a meaningful shift, but you don't need to fully understand it to start automating. Start with rule-based automations. Add AI steps once you've got a feel for where the rigid rules break down. If you want to go deeper on the AI side once you're ready, my post on agentic AI is the next step up.
What's a good fit for automation — and what isn't
Not every task should be automated. Knowing the difference is half the battle.
Good fits:
- Repetitive. You do it the same way, over and over. The more often it repeats, the more an automation pays back.
- Rule-based. The decision rules are clear enough to write down. "If the form has a US zip code, send to Sales. Otherwise, send to International."
- Time-consuming in aggregate. Maybe each instance only takes 5 minutes — but you do it 20 times a week. That's an hour and a half of your week, every week.
- Low-judgment. No real expertise required to do the task itself.
Bad fits:
- Tasks that require real judgment. Anything where the right answer depends on context, relationships, or nuance the automation can't see.
- Tasks that change constantly. If the rules shift every month, you'll spend more time updating the automation than the automation saves.
- Tasks you only do once or twice. The time to build the automation outweighs the savings.
- Anything irreversible without a human checkpoint. Sending a final invoice, executing a transaction, firing off something to a customer — these usually deserve a human review step even when an automation does the work to set them up.
I've written more about the strategic side of this — what not to automate, and why people get burned trying — in What to Know Before You Automate.
Where to go from here
If you've read this far, you've got the mental model. Trigger, pass data, action. Filters and branches when you need decisions. Workflows when one thing leads to another. Three places automations live. AI in the middle when the rules need to bend.
The next step is picking a tool and building one. For that, my post on low-code automation tools walks through the three platforms I actually use — Make.com, Zapier, and n8n — and when I reach for each one. Start with the simplest possible automation that solves a real problem in your day. Don't try to build the perfect system on your first attempt. Just get something running, see how it feels, and grow from there.
If you want help thinking through what to automate first, book a free 30-minute call and we'll map it out together.